
In my last post, I showed you how to completely replace the ContextMenu of the WPF Window so that when you right click the title bar of the Window, you could show a custom ContextMenu to perform custom actions. Well, soon after posting that blog my good friend Tim Heuer suggested that you should append the menu instead of replacing. I completely agree! So, what do you do if you want to simply append the existing system ContextMenu with custom menu items? This would allow you to keep all the existing Window ContextMenu functionality, while at the same time exposing all your custom actions as well.
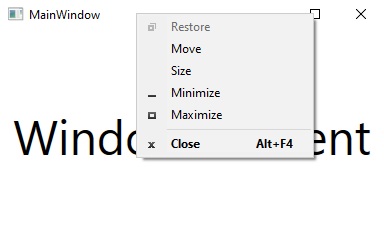
Let’s take a quick look at the WPF Window’s default system ContextMenu:
Now, what does it take to append this menu with our own custom menu items? Not much really. Let’s take a look.
First, let’s add a Loaded event handler to our Window. In this handler, we are going to use the WindowInteropHandler to add a hook to the Window’s messaging:
public MainWindow()
{
    InitializeComponent();
    Loaded += MainWindow_Loaded;
}

private void MainWindow_Loaded(object sender, RoutedEventArgs e)
{
    IntPtr windowhandle = new WindowInteropHelper(this).Handle;
    HwndSource hwndSource = HwndSource.FromHwnd(windowhandle);
    hwndSource.AddHook(new HwndSourceHook(WndProc));
}

private IntPtr WndProc(IntPtr hwnd, int msg, IntPtr wParam, IntPtr lParam, ref bool handled)
{
    return IntPtr.Zero;
}
Next, we need to bring in two Win32 API methods using the DllImport attribute. These methods will allow us to gain access to the WPF Window’s system ContextMenu and insert our custom items into it.
[DllImport("user32.dll")]
private static extern IntPtr GetSystemMenu(IntPtr hWnd, bool bRevert);

[DllImport("user32.dll")]
private static extern bool InsertMenu(IntPtr hMenu, Int32 wPosition, Int32 wFlags, Int32 wIDNewItem, string lpNewItem);
Now comes probably the most confusing part of this entire post. We need to define the constants that we need to use to insert our custom menu items and respond to them being clicked. I’ll comment them so you have an understanding of what each one is used for.
//A window receives this message when the user chooses a command from the Window menu, or when the user chooses the maximize button, minimize button, restore button, or close button.
public const Int32 WM_SYSCOMMAND = 0x112;
//Draws a horizontal dividing line.This flag is used only in a drop-down menu, submenu, or shortcut menu.The line cannot be grayed, disabled, or highlighted.
public const Int32 MF_SEPARATOR = 0x800;
//Specifies that an ID is a position index into the menu and not a command ID.
public const Int32 MF_BYPOSITION = 0x400;
//Specifies that the menu item is a text string.
public const Int32 MF_STRING = 0x0;
//Menu Ids for our custom menu items
public const Int32 _ItemOneMenuId = 1000;
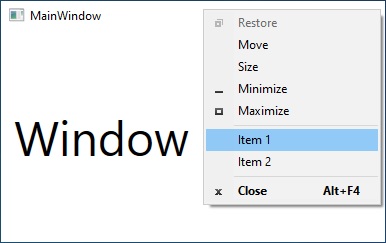
public const Int32 _ItemTwoMenuID = 1001;This would be a good time to modify the MainWindow_Loaded event handler to insert our custom menu items. We will want to insert our custom menu items right after we grab the handle for the window. We need to get the handle to the current system menu by calling the GetSystemMenu method we imported earlier. Once we have that handle, we will insert a horizontal menu separator, and then two menu items labeled “Item 1″ and Item 2”.
private void MainWindow_Loaded(object sender, RoutedEventArgs e)
{
    IntPtr windowhandle = new WindowInteropHelper(this).Handle;
    HwndSource hwndSource = HwndSource.FromHwnd(windowhandle);

    //Get the handle for the system menu
    IntPtr systemMenuHandle = GetSystemMenu(windowhandle, false);

    //Insert our custom menu items
    InsertMenu(systemMenuHandle, 5, MF_BYPOSITION | MF_SEPARATOR, 0, string.Empty); //Add a menu seperator
    InsertMenu(systemMenuHandle, 6, MF_BYPOSITION, _ItemOneMenuId, "Item 1"); //Add a setting menu item
    InsertMenu(systemMenuHandle, 7, MF_BYPOSITION, _ItemTwoMenuID, "Item 2"); //add an About menu item

    hwndSource.AddHook(new HwndSourceHook(WndProc));
}
If you look at the code above, you will see that the first argument in the InsertMenu method is the handle to the system menu, next is the position the menu item should be placed, followed by the menu flags. The “MF” prefix in our constants stand for “Menu Flags”. After the menu flags, we provide the unique ID for our menu items. Lastly, is the text that will be displayed in our menu item. Look , there they are!
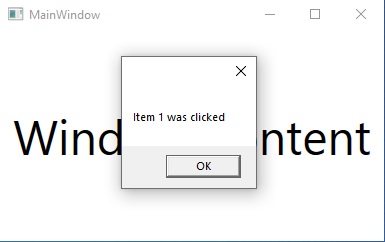
Our last step is to modify the WndProc method to listen for our menu items being clicked and call our code for those specific menu items. We start by listening for the SystemCommand message. This message is called any time the user chooses a command from the Window system menu. Once we know we are inviking a menu item command, we check the parameter to see which menu item it is. This is where we check to see if the menu is one of our custom menu items by checking the wParam against our menu item Id. Once we know which menu item is being clicked, we can provide the logic to be invoked. In this case, we are showing a simple message box.
private IntPtr WndProc(IntPtr hwnd, int msg, IntPtr wParam, IntPtr lParam, ref bool handled)
{
    // Check if the SystemCommand message has been executed
    if (msg == WM_SYSCOMMAND)
    {
        //check which menu item was clicked
        switch (wParam.ToInt32())
            {
                case _ItemOneMenuId:
                    MessageBox.Show("Item 1 was clicked");
                    handled = true;
                    break;
                case _ItemTwoMenuID:
                    MessageBox.Show("Item 2 was clicked");
                    handled = true;
                    break;
            }
    }

    return IntPtr.Zero;
}
Once we have all our code in order, run the app, right click the window title bar, select one of your new menu items, and watch the magic happen.
That’s it! That’s all there is to it. Be sure to get the code and play with it.