A new version of the Extended WPF Toolkit is now available with three great new controls. I have been hard at work fixing bugs, adding functionality and creating new controls. Lets take a look at the new controls added to the 1.2.0 release of the Extended WPF Toolkit.
The ButtonSpinner
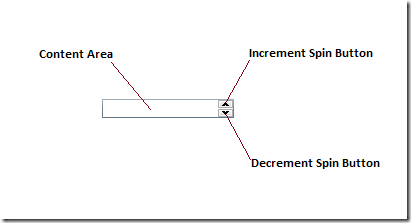
The ButtonSpinner control allows you to add button spinners to any element and then respond to the Spin event to manipulate that element. The Spin event lets the developer know which direction the buttons are spinning; SpinDirection.Increase indicates an increment, SpinDirection.Decrease indicates a decrement.
As an example lets create our own numeric spin control. Lets start by creating a ButtonSpinner in XAML and then place a TextBox in the Content of the ButtonSpinner control.
<TextBox Text="0" HorizontalContentAlignment="Right" />
</toolkit:ButtonSpinner>
Add an event handler for the Spin event and handle it accordingly.
{
ButtonSpinner spinner = (ButtonSpinner)sender;
TextBox txtBox = (TextBox)spinner.Content;
int value = String.IsNullOrEmpty(txtBox.Text) ? 0 : Convert.ToInt32(txtBox.Text);
if (e.Direction == Microsoft.Windows.Controls.SpinDirection.Increase)
value++;
else
value–;
txtBox.Text = value.ToString();
}
The NumericUpDown
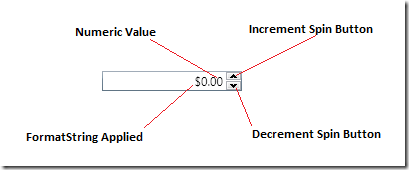
The NumericUpDown control provides a TextBox with button spinners that allow incrementing and decrementing numeric values by using the spinner buttons, keyboard up/down arrows, or mouse wheel.
When using the NumericUpDown in data binding scenarios, bind your object’s value to the NumericUpDown.Value property. You can specify how much to increment the value by setting the NumericUpDown.Increment property. You can control the minimum and maximum allowed values by setting the NumericUpDown.Minimum property and the NumericUpDown.Maximum property. You can also specify if the user can directly edit the values in the text box by setting the IsEditable property. If you would like to get the actual formatted string representation of the value, you can use the NumericUpDown.Text property.
Lets see how to use it:
You can apply text formatting by setting the FormatString property to one of the supported format strings. Here is a list of the supported formats.
| Format Specifier | Name |
| C | Currency |
| F | Fixed Point |
| G | General |
| N | Number |
| P | Percent |
The RichtextBoxFormatBar
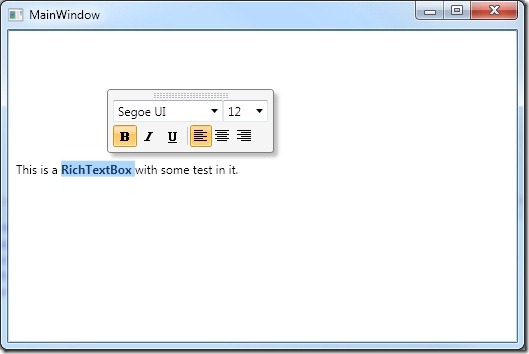
The RichTextBoxFormatBar is a contextual formtting toolbar that mimics the behavior of the Microsoft Office 2010 formatting bar. It can be attached to any RichTextbox control by using the RichTextBoxFormatBarManager. You can even create your own formatting bar and use it instead, but still have all the functionality the RichTextboxFormatBarManager provides.
The RichTextBoxFormatBar is a contextual text formatting toolbar that will apply text transformations to the selected text of a RichTextBox control. When the user is in the process of a selection, the RichTextBoxFormatBar will appear when the mouse is released after the selection. The RichTextBoxFormatBar will also appear during the last click of a "double-click" selection. While the RichTextFormatBar is shown, you may click on any number of text transformations to be applied to the selected text. When done, you may click anywhere else in the RichTextBox control or move your mouse outside of the RichTextBox control to hide the RichTextBoxFormatBar. You can also drag the RichTextBoxFormatBar to a different position if it shows in a position that is not desired by clicking and holding on the drag thumb and moving your mouse to the desired location.
You can add the RichTextBoxFormatBar to either the toolkit’s RichTextBox or the default Windows RichTextBox. This is done by using the RichTextBoxFormatBarManager. You simply set the RichTextBoxFormatBarManager.FormatBar property to the desired IRichTextBoxFormatBar instance. The following snippet adds the RichTextBoxFormatBar to the Extended WPF Toolkit’s RichTextBox.
<toolkit:RichTextBoxFormatBarManager.FormatBar>
<toolkit:RichTextBoxFormatBar />
</toolkit:RichTextBoxFormatBarManager.FormatBar>
</toolkit:RichTextBox>
You create your own custom format bar by creating a custom/user control that implements the IRichTextBoxFormatBar interface and set the RichTextBoxFormatBarManager.FormatBar property to your new custom format bar instance.
<toolkit:RichTextBoxFormatBarManager.FormatBar>
<local:MyCustomFormatBar />
</toolkit:RichTextBoxFormatBarManager.FormatBar>
</RichTextBox>
As always, please download and use them. Help me find the bugs and make this toolkit a solid toolset that any WPF developer would want in their toolbox. please submit all issues to the Discussions section of the Extended WPF Toolkit project site.


