Yesterday I announced the release of our new XamGantt and XamSyntaxEditor CTP controls. In this post we are going to get to know the XamSyntaxEditor. The XamSyntaxEditor is a highly customizable text editing control that provides syntax highlighting and editing behaviors much like the Visual Studio code editor. The XamSyntaxEditor is provided in both WPF and Silverlight versions with an API that is common across both platforms, enabling you to incorporate code editing capabilities into your cross platform applications. Like the Visual Studio code editor, the XamSyntaxEditor is extensible, and where possible the control (as well as the TextDocument framework) implements APIs that are familiar to Visual Studio extension writers which makes it easy to adapt Visual Studio extension code for use with the XamSyntaxEditor control. While there is not a one-to-one correspondence in APIs, the basic structure of the extensibility APIs (e.g., ITag, ITagAggregator, ITagger, ITaggerProvider, AdornmentLayerInfo etc.) are similar.
As you know, the best way to get to know a control is to just start using it. The first thing you need to do is make sure you have the latest May 2012 Service Release installed and then go get the CTP bits from your Infragistics account. Now, let’s write some code.
Let’s start by creating a new WPF application, or Silverlight if you prefer, and add our references to the CTP.

Next open your MainWindow.xaml and add the “ig” namespace to your XAML.
xmlns=”http://schemas.microsoft.com/winfx/2006/xaml/presentation”
xmlns:x=”http://schemas.microsoft.com/winfx/2006/xaml”
xmlns:ig=”http://schemas.infragistics.com/xaml”
Title=”MainWindow” Height=”350″ Width=”525″ >
</Window>
Now we want to add an instance of a XamSyntaxEditor to our view. I am leaving some space for a menu so we can start playing around with the functionality of the XamSyntaxEditor.
<Grid.RowDefinitions>
<RowDefinition Height=”Auto” />
<RowDefinition Height=”*” />
</Grid.RowDefinitions>
<Menu>
<MenuItem Header=”File”>
<MenuItem Header=”Open” />
</MenuItem>
</Menu>
<ig:XamSyntaxEditor Grid.Row=”1″/>
</Grid>
Now that we have a XamSyntaxEditor to work with, it’s time to create a TextDocument. What is a TextDocument? I’m glad you asked. The XamSyntaxEditor control uses a TextDocument framework as the foundation for the code editing features it provides.
The TextDocument framework makes use of the following major features:
- Document lexing an parsing
- Document updating with full Undo/Redo support.
- Document change tracking based on thread-safe, immutable snapshots of the document state created and maintained after each update applied by the XamSyntaxEditor.
- Snapshot translation services that enable text locations to be translated from one snapshot to another.
- Tagging and Classification infrastructure to identify known document parts and highlight them (syntax highlighting).
Now, a TextDocument is a class that represents a single text file and exposes properties, methods, and events for that document. You must provide a TextDocument to the XamSyntaxEditor.Document property for it to function. Now, I am a big MVVM advocate so we will be writing this app using the MVVM pattern. Let’s start by creating a simple ViewModel that implements INotifyPropertyChanged, and has a TextDocumentProperty in it.
{
private TextDocument _document;
public TextDocument Document
{
get { return _document; }
set
{
_document = value;
NotifyPropertyChanged(“Document”);
}
}
public SyntaxEditorViewModel()
{
Document = new TextDocument();
}
public event PropertyChangedEventHandler PropertyChanged;
protected void NotifyPropertyChanged(string propertyName)
{
var handler = PropertyChanged;
if (handler != null)
PropertyChanged(this, new PropertyChangedEventArgs(propertyName));
}
}
Now that we have our Document, we need to decide which Language we want to use. Eventually we will let the user decide, but for now we will hard code it. The XamSyntaxEditor supports three languages out of the box. We provide a CSharpLanguage class, a VisualBasicLanguage class, and a PlainTextLanguage class. Of course, eventually you will be able to create your own custom languages, but we’ll save that for another post. For our purposes I will be using the CSharpLanguage. I will modify the constructor of my ViewModel as follows.
{
Document = new TextDocument();
Document.Language = new CSharpLanguage();
}
Now I need to update my View to databind the XamSyntaxEditor.Document property to the ViewModel’s Document property.
Document=”{Binding Document}“/>
Wow, that was easy. Let’s run the app and see what we get. Don’t forget to set the DataContext of your view to an instance of our ViewModel.

As you can see, the XamSyntaxEditor will start providing syntax highlighting for me as I type keywords. I know what you’re thinking; “That is freaking awesome”. I know, right. Now let’s start adding some functionality such as opening a file from disk. Let’s create a command in our ViewModel that will open a file from disk and load our XamSyntaxEditor with it’s content.
{
private TextDocument _document;
public TextDocument Document
{
get { return _document; }
set
{
_document = value;
NotifyPropertyChanged(“Document”);
}
}
public ICommand OpenCommand { get; set; }
public SyntaxEditorViewModel()
{
Document = new TextDocument();
Document.Language = new CSharpLanguage();
OpenCommand = new RelayCommand(OpenDocument);
}
private void OpenDocument()
{
// Show a file open dialog with special handling for WPF and Silverlight
OpenFileDialog dialog = new OpenFileDialog();
dialog.FilterIndex = 1;
dialog.Filter = “C# Files |*.cs”;
bool? open = dialog.ShowDialog();
if (open.HasValue && open.Value == true)
{
// Load the file into the TextDocument.
try
{
Document.Load(dialog.OpenFile());
}
catch (Exception ex)
{
MessageBox.Show(string.Format(“Error ‘{0}’ while loading file.”, “Error Loading File”, ex.Message), “Error Loading File”, MessageBoxButton.OK);
return;
}
}
}
public event PropertyChangedEventHandler PropertyChanged;
protected void NotifyPropertyChanged(string propertyName)
{
var handler = PropertyChanged;
if (handler != null)
PropertyChanged(this, new PropertyChangedEventArgs(propertyName));
}
}
As you can see, I am using an implementation of a RelayCommand which allows my to provide methods to invoke in the constructor of the command instantiation. I am calling the TextDocument.Load(stream) method to load the content from the select file. Now update our menu to data bind to our new command.
<MenuItem Header=”File”>
<MenuItem Header=”Open” Command=”{Binding OpenCommand}” />
</MenuItem>
</Menu>
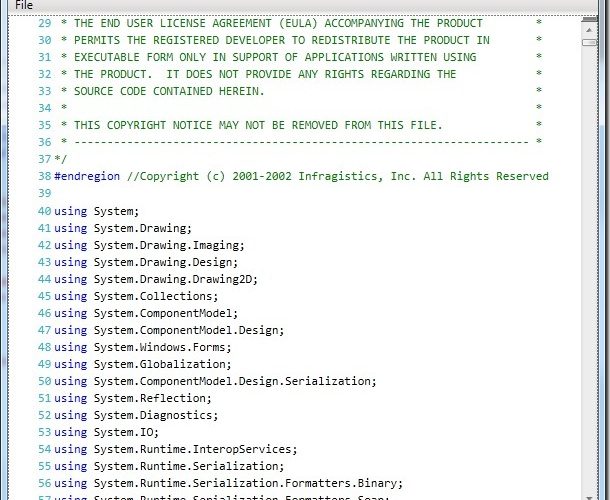
Run it, click the File –> Open menu item, then select a .cs file from your disk, and watch the magic happen.

Checkout how freaking fast your document loads! I selected a 175,000 line CSharp file and it loaded before I could finish my blink.
Alright, so we got loading a document, now let’s knock out saving a file. Add a new menu item to your View and a new command to your ViewModel for saving. I went ahead and wrote all the code for you.
{
FileInfo _fileInfo;
private TextDocument _document;
public TextDocument Document
{
get { return _document; }
set
{
_document = value;
NotifyPropertyChanged(“Document”);
}
}
private bool _isDirty = false;
public bool IsDirty
{
get { return _isDirty; }
set
{
_isDirty = value;
NotifyPropertyChanged(“IsDirty”);
}
}
private bool _isNew = false;
public bool IsNew
{
get { return _isNew; }
set
{
_isNew = value;
NotifyPropertyChanged(“IsNew”);
}
}
public ICommand OpenCommand { get; set; }
public ICommand SaveCommand { get; set; }
public SyntaxEditorViewModel()
{
CreateNewDocument();
OpenCommand = new RelayCommand(OpenDocument);
SaveCommand = new RelayCommand(SaveDocument, CanSaveDocument);
}
void Document_TextChanged(object sender, TextChangedEventArgs e)
{
IsDirty = true;
}
private void CreateNewDocument()
{
if (Document != null)
Document.TextChanged -= Document_TextChanged;
Document = new TextDocument();
Document.Language = new CSharpLanguage();
Document.TextChanged += Document_TextChanged;
IsNew = true;
}
private void OpenDocument()
{
// Show a file open dialog with special handling for WPF and Silverlight
OpenFileDialog dialog = new OpenFileDialog();
dialog.FilterIndex = 1;
dialog.Filter = “C# Files |*.cs”;
bool? open = dialog.ShowDialog();
if (open.HasValue && open.Value == true)
{
// Load the file into the TextDocument.
try
{
_fileInfo = new FileInfo(dialog.FileName);
using (var stream = _fileInfo.OpenRead())
{
Document.Load(stream);
}
IsNew = false;
}
catch (Exception ex)
{
MessageBox.Show(string.Format(“Error ‘{0}’ while loading file.”, “Error Loading File”, ex.Message), “Error Loading File”, MessageBoxButton.OK);
return;
}
}
}
private void SaveDocument()
{
if (IsNew)
SaveNewDocument();
else
SaveCurrentDocument(_fileInfo.OpenWrite());
IsNew = false;
IsDirty = false;
}
private bool CanSaveDocument()
{
return IsNew || IsDirty;
}
private void SaveNewDocument()
{
SaveFileDialog saveDialog = new SaveFileDialog();
saveDialog.Filter = “C# Files |*.cs”;
bool? result = saveDialog.ShowDialog();
if (result.Value)
{
SaveCurrentDocument(saveDialog.OpenFile());
_fileInfo = new FileInfo(saveDialog.FileName);
}
}
private void SaveCurrentDocument(Stream fileStream)
{
try
{
using (StreamWriter streamWriter = new StreamWriter(fileStream))
{
streamWriter.Write(Document.CurrentSnapshot.GetText());
}
}
catch (Exception ex)
{
MessageBox.Show(string.Format(“Error ‘{0}’ while saving file”, “Error Saving File”, ex.Message), “Error Saving File”, MessageBoxButton.OK);
}
}
#region INotifyPropertyChanged
public event PropertyChangedEventHandler PropertyChanged;
protected void NotifyPropertyChanged(string propertyName)
{
var handler = PropertyChanged;
if (handler != null)
PropertyChanged(this, new PropertyChangedEventArgs(propertyName));
}
#endregion //INotifyPropertyChanged
}
As you can see, I made some minor changes to the ViewModel. I added some properties to keep track of new documents and if the document is “dirty”. I hooked into the TextDocument.TextChanged event and set the IsDirty property to false whenever the text changes which signals that the document has changes and can be saved. That about wraps it up for this post. Now you have enough information to start creating documents, loading text, and saving your changes to a file. I will be coving other features in future posts.
As always, you can download the source.