Sometimes when a technology has been out awhile, some features are forgotten about. With the release of WPF 4 came libraries that allow you, as the developer, to do some pretty cool stuff with the Windows 7 Task Bar, such as create the following features:
- Thumbnail Buttons
- Jump Lists
- Overlay Icons
- Progress bar icons
This will be the first part in a four part series covering how to implement each of those features. This post will cover the first bullet in the list, Thumbnail buttons.
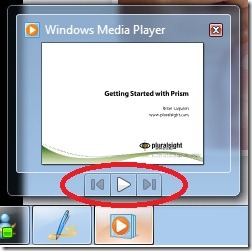
Thumbnail buttons are buttons that can be added over your application’s icon that allow the user to execute custom actions. If you are using the Windows Scenic theme, the buttons will show just below the applications screenshot when you hover over the application icon in the task bar.
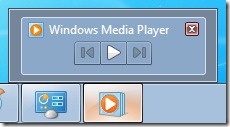
If you are using a basic theme it will look like this:
Since Windows Media Player is such a good example, we will create our own media player and implement our own thumbnail buttons. Lets start off by defining our interface. All we really need is a menu so we can open our media file to play, we need a MediaElement to show the media file, and we need some buttons to Play, Pause, and Stop the media file.
<Grid.RowDefinitions>
<RowDefinition Height=”Auto” />
<RowDefinition Height=”*” />
<RowDefinition Height=”Auto” />
</Grid.RowDefinitions>
<Menu>
<MenuItem Header=”File”>
<MenuItem Header=”Open” Click=”OpenMediaSource” />
</MenuItem>
</Menu>
<MediaElement x:Name=”_mediaPlayer” Grid.Row=”1″ LoadedBehavior=”Manual” UnloadedBehavior=”Stop” />
<Grid Grid.Row=”2″ Background=”Gainsboro”>
<StackPanel Orientation=”Horizontal” HorizontalAlignment=”Center”>
<Button x:Name=”_play” Command=”MediaCommands.Play”>
<Image Source=”Images/play32.png” />
</Button>
<Button x:Name=”_pause” Command=”MediaCommands.Pause” >
<Image Source=”Images/pause32.png” />
</Button>
<Button x:Name=”_stop” Command=”MediaCommands.Stop” >
<Image Source=”Images/stop32.png” />
</Button>
</StackPanel>
</Grid>
</Grid>
Will will notice that we have an event handler for our Open menu item and we have assigned a few commands to our buttons. Lets go ahead at look at the code for opening a media file.
{
OpenFileDialog dialog = new OpenFileDialog();
dialog.Title = “Select media file”;
dialog.Filter = “Avi & Wmv|*.avi;*.wmv”;
if ((bool)dialog.ShowDialog())
{
_mediaPlayer.Source = new Uri(dialog.FileName, UriKind.RelativeOrAbsolute);
_mediaPlayer.Play();
}
}
This code is pretty straight forward, we simple create a new instance of an OpenFileDialog, set a filter so we restrict the type of file the user can open, and when the user selects the file, we go ahead and set the source of our media player and immediately start playing it. The next thing we need to do is address those commands we are referencing on our buttons. So let’s go ahead and create some CommandBindings for the MediaCommands and implement them accordingly.
<CommandBinding Command=”MediaCommands.Play” Executed=”PlayCommand_Executed” CanExecute=”Command_CanExecute”/>
<CommandBinding Command=”MediaCommands.Stop” Executed=”StopCommand_Executed” CanExecute=”Command_CanExecute”/>
<CommandBinding Command=”MediaCommands.Pause” Executed=”PauseCommand_Executed” CanExecute=”Command_CanExecute”/>
</Window.CommandBindings>
Now for this example, all the commands will use the same CanExecute method. The only thing I care about is if the Source of the MediaElement is null.
{
_mediaPlayer.Play();
}
private void StopCommand_Executed(object sender, ExecutedRoutedEventArgs e)
{
_mediaPlayer.Stop();
}
private void PauseCommand_Executed(object sender, ExecutedRoutedEventArgs e)
{
_mediaPlayer.Pause();
}
private void Command_CanExecute(object sender, CanExecuteRoutedEventArgs e)
{
e.CanExecute = _mediaPlayer.Source != null;
}
Great. Now we have the basic application finished. Here is what my version looks like after loading a media file to play. (shameless plug)
Now it is time to move on to creating our thumbnail buttons. We want to add Play, Pause, and Stop buttons. The key to this is the Window’s TaskbarItemInfo object. In order to add thumbnail buttons we need to define a TaskbarItemInfo object, and then populate the ThumbButtonInfos property with a ThumbButtonInfoCollection with some ThumbButtonInfo objects. Sounds confusing doesn’t it? Well, it’s not bad. Let’s look at some code.
<TaskbarItemInfo Description=”Media Controls”>
<TaskbarItemInfo.ThumbButtonInfos>
<ThumbButtonInfoCollection>
<ThumbButtonInfo Description=”Play” DismissWhenClicked=”False” Command=”MediaCommands.Play” CommandTarget=”{Binding ElementName=_play}”
ImageSource=”Images/play16.png” />
<ThumbButtonInfo Description=”Pause” DismissWhenClicked=”False” Command=”MediaCommands.Pause” CommandTarget=”{Binding ElementName=_pause}”
ImageSource=”Images/pause16.png” />
<ThumbButtonInfo Description=”Stop” DismissWhenClicked=”False” Command=”MediaCommands.Stop” CommandTarget=”{Binding ElementName=_stop}”
ImageSource=”Images/stop16.png” />
</ThumbButtonInfoCollection>
</TaskbarItemInfo.ThumbButtonInfos>
</TaskbarItemInfo>
</Window.TaskbarItemInfo>
As you can see, I set a Description property on the TaskbarItemInfo. The Description property will show a tooltip when the mouse passes over the thumbnail. Inside the ThumbButtonInfoCollection I created three ThumbButtonInfo objects, one for each button we are creating. The Description property on the ThumbButtonInfo shows a tooltip when the mouse hovers over the button. The DismissWhenClicked property tells the button is if should close the thumbnail once click, or if will keep the thumbnail open even after being clicked. We set an image source, and a Command for each button. The Command is the same command as the corresponding CommandBindings we created earlier.
[Important] Now pay special attention to the CommandTarget property.
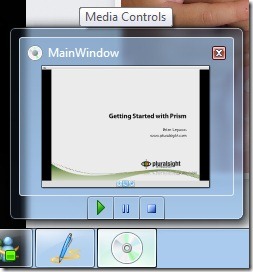
The CommandTarget property binds the thumbnail button to the related button in our WPF window. If you do not set the CommandTarget property, the command will NOT work. Now that we have all the plumbing done, go ahead and run it. When the application is running, move your mouse over the application’s icon and watch the magic happen. You will immediately see our thumbnail buttons under our application screenshot, which are fully functional.
Go download the source and start brain storming on how you can use this feature to improve the user experience of your application.


