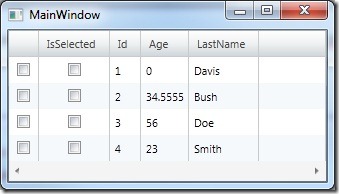
I was reading the Infragistics forums today and noticed a common question regarding the XamGrid control. Basically, there is a need to place checkboxes in the row selector of the XamGrid, and then data bind those checkboxes to a property of the bound row object. The expected behavior is when a checkbox is selected in the row selector column, the data bound property of the object representing the row will be set to true indicating that the object is in a selected state. This will give the developer the opportunity to distinguish selected objects from within a bound collection that may (and probably should) exist in a ViewModel. So how do we accomplish this task? It’s actually quite simple, but there are some things you should consider.
Before we get started coding up our solution, we need to have some dummy data and infrastructure to work with. Lets start with our Model and ViewModel. Our Model will be a simple Person object implemented as follows:
{
private bool _isSelected = false;
public bool IsSelected
{
get { return _isSelected; }
set
{
_isSelected = value;
NotifyPropertyChanged(“IsSelected”);
}
} private int id;
public int Id
{
get { return id; }
set
{
id = value;
NotifyPropertyChanged(“Id”);
}
}
private double age;
public double Age
{
get { return age; }
set
{
age = value;
NotifyPropertyChanged(“Age”);
}
}
private String lastName;
public String LastName
{
get { return lastName; }
set
{
lastName = value;
NotifyPropertyChanged(“LastName”);
}
}
public event PropertyChangedEventHandler PropertyChanged;
private void NotifyPropertyChanged(String propertyName)
{
if (PropertyChanged != null)
{
PropertyChanged(this, new PropertyChangedEventArgs(propertyName));
}
}
}
Nothing fancy, just some simple properties and the implementation of INotifyPropertyChanged. Now let’s create a ViewModel that will contain a collection of Person objects that we will bind to our XamGrid:
{
private ObservableCollection<Person> _people;
public ObservableCollection<Person> People
{
get { return _people; }
set
{
_people = value;
NotifypropertyChanged(“People”);
}
} public MyViewModel()
{
People = new ObservableCollection<Person>();
People.Add(new Person() { Id = 1, LastName = “Davis” });
People.Add(new Person() { Id = 2, LastName = “Bush”, Age = 34.5555 });
People.Add(new Person() { Id = 3, LastName = “Doe”, Age = 56 });
People.Add(new Person() { Id = 4, LastName = “Smith”, Age = 23 });
}
public event PropertyChangedEventHandler PropertyChanged;
protected void NotifypropertyChanged(string propertyName)
{
var handler = PropertyChanged;
if (handler != null)
PropertyChanged(this, new PropertyChangedEventArgs(propertyName));
}
}
Don’t forget to set the DataContext of your View to an instance of your ViewModel. I will assume you know how to do this and move on.
Let’s start working on our View. First make sure you have the following namespaces in your View:
xmlns:ig=”http://schemas.infragistics.com/xaml”
The first namespace points to the primitives namespace where we will find the RowSelectorCellControl. The second one obviously is the namespace for the XamGrid control. Go ahead and add the following markup to your view.
<ig:XamGrid.SelectionSettings>
<ig:SelectionSettings RowSelection=”None”/>
</ig:XamGrid.SelectionSettings>
<ig:XamGrid.RowSelectorSettings>
<ig:RowSelectorSettings Visibility=”Visible” EnableRowNumbering=”False” >
<ig:RowSelectorSettings.Style>
<Style TargetType=”{x:Type prim:RowSelectorCellControl}“>
<Setter Property=”ContentTemplate”>
<Setter.Value>
<DataTemplate>
<CheckBox Name=”_checkBoxDataTemplate” />
</DataTemplate>
</Setter.Value>
</Setter>
</Style>
</ig:RowSelectorSettings.Style>
</ig:RowSelectorSettings>
</ig:XamGrid.RowSelectorSettings>
</ig:XamGrid>
As you can see, we have declared a XamGrid control and bound it to the People collection that exists in our ViewModel. We have declared the RowSelectorSettings and provided a custom style for it. Our style simply sets the ContentTemplate to a Checkbox. Exactly what we want.

If you run the application you will see our Checkboxes are where they should be, but there are two issues with our current state. One, you have to double click the checkbox to place it in a checked state. Two nothing happens when you put them in the checked state. So let’s fix these issues starting with issue one. In order to have the Checkbox respond immediately to a click we need to handle the PreviewMouseLeftButtonDown event.
<CheckBox Name=”_checkBoxDataTemplate”
PreviewMouseLeftButtonDown=”CheckBox_PreviewMouseLeftButtonDown” />
</DataTemplate>
And our handler looks like this:
{
var checkbox = sender as CheckBox;
if (checkbox != null)
checkbox.IsChecked = !checkbox.IsChecked;
}
Now when you click on the checkbox it will immediately change its checked state. Next we need to data bind the IsSelected property of our Person object representing a row to the checkbox. Now this is the really tricky part. Without the correct binding syntax, this will never work. So make note of this:
<CheckBox Name=”_checkBoxDataTemplate”
IsChecked=”{Binding Cell.Row.Data.IsSelected, RelativeSource={RelativeSource AncestorType={x:Type prim:RowSelectorCellControl}}}“
PreviewMouseLeftButtonDown=”CheckBox_PreviewMouseLeftButtonDown” />
</DataTemplate>
We are binding to the RowSelectorCellControl.Cell.Row.Data.IsSelected property. Confused yet? The thing you really need to understand is that the Cell.Row.Data property is the bound object, in this case the Person object that represents the row. From this property, you can access all the properties that are declared the Person object.

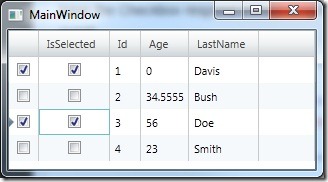
Now when you run the application, you will notice that whenever you click on a checkbox the Person.IsSelected property value changes to reflect the current selection state. Pretty simple now that you see the code.
Highlighting Selection
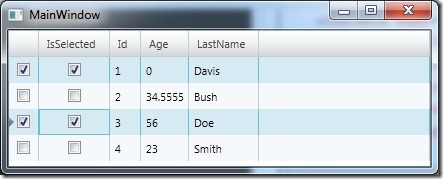
There are some subtle issues that you may not have noticed right away, and maybe you don’t care about them. The first thing is that when a checkbox is checked, the row is marked a selected, but the row visually does not accurately represent that it is selected. What we want to happen is that when a row is selected it should be highlighted. To fix this, we need to add a little code-behind.
“Take a deep breath… Calm down… It’s okay to have code behind in an MVVM application. We are only manipulating UI components. No data will be harmed in the making of this MVVM application.”
I made some modifications to our DataTemplate as follows:
<CheckBox Name=”_checkBoxDataTemplate”
IsChecked=”{Binding Cell.Row.Data.IsSelected, RelativeSource={RelativeSource AncestorType={x:Type prim:RowSelectorCellControl}}}“
Checked=”CheckBox_Checked”
Unchecked=”CheckBox_Unchecked”
PreviewMouseLeftButtonDown=”CheckBox_PreviewMouseLeftButtonDown”
Tag=”{Binding Cell.Row.Index, RelativeSource={RelativeSource AncestorType={x:Type prim:RowSelectorCellControl}}}“/>
</DataTemplate>
As you can see I added handlers for the Checked and Unchecked events of the Checkbox. I am also storing the row index in the Tag of the checkbox. This will be used to find the row in the event handers. Let’s take a look at our two event handlers:
{
int index = (int)(sender as CheckBox).Tag;
_xamGrid.SelectionSettings.SelectedRows.Add(_xamGrid.Rows[index]);
}private void CheckBox_Unchecked(object sender, RoutedEventArgs e)
{
if (_xamGrid.SelectionSettings.SelectedRows.Count > 0)
{
int index = (int)(sender as CheckBox).Tag;
_xamGrid.SelectionSettings.SelectedRows.Remove(_xamGrid.Rows[index]);
}
}
In the CheckBox.Checked event handler we are grabbing the row index from the CheckBox.Tag property. Then we use that to add the row to the SelectionSettings.SelectedRows property. This will highlight the row when it becomes selected by the checkbox. In the CheckBox.UnChecked event, we first make sure we have a collection to remove from, then once again use the row index we stored in the tag property to remove the row from the SelectedRows property. This will remove the highlight from the row when it is marked as unselected.

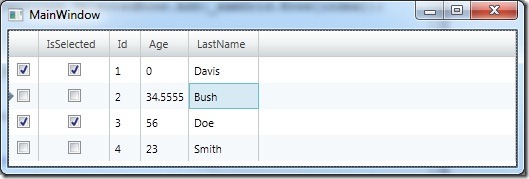
Now things are starting to look like they function properly. Not quite. Notice what happens when you select a couple of rows then click in any cell of any row.

That’s right… We lose our selection highlights, but our checkboxes are still checked. As you can see, this may cause some confusion to the user. So we need to add some code to handle this. I’m going to take the easy way out of this and say that anytime a user clicks in a cell, only the row that contains that cell will become selected and all others will be de selected. If you want to have it more complicated to where all the rows stay selected no matter what, you would simply need to keep track of the selected rows in a variable to manually manage them.
So here’s my quick and dirty fix. Add an event handler for the XamGrid.CellClicked event as follows:
{
foreach (Row item in _xamGrid.Rows)
{
CheckBox cb = Utilities.GetDescendantFromName(item.Control, “_checkBoxDataTemplate”) as CheckBox;
cb.IsChecked = false;
}
CheckBox cb1 = Utilities.GetDescendantFromName(e.Cell.Row.Control, “_checkBoxDataTemplate”) as CheckBox;
cb1.IsChecked = true;
}
Now our selection highlights will function as expected.

Be sure to download the source code and let me know if you have any questions.


[…] based on its name. Add comments Aug 222012 Back in July I wrote a blog post that showed how to add a checkbox to the row selector of the XamGrid and data bind to it. The […]